Google’s Chromium OS is, uh, a browser

Google’s forthcoming Chromium OS has gotten a lot of buzz recently. My trusty old EeePC 4G Surf has become quite the sandbox for trying out different netbook operating systems, so of course now it is running Chromium. I downloaded the latest of Hexxeh’s Chrome builds, copied the image onto a 1gb thumb drive, and then installed the image onto the SSD in my EeePC. It boots to the signon screen in about 15 seconds:

You login using your Google/Gmail credentials, since this is an OS for the cloud (of course, I had to login with the default ‘facepunch’ from Hexxeh’s FAQ first so I could join the netbook to my wireless network before it could authenticate my Google login).

As you can see from the login screen in my video above, it’s not well suited for the smaller 7″ screen on my EeePC. The settings dialog, for instance, goes off the bottom of the screen and the usual Alt+mouse to drag a window doesn’t seem to work. Also, since this was installed as an image, the SSD drive looks like just a 1gb drive so I’m missing out on the other 3gb for storage. Graphics performance isn’t that great either.

Other than that, I’ve successfully turned my netbook into a almost fully functional Ubuntu machine into a device that only runs a browser. 😮 Hmmm. I guess this is the simplicity Google is shooting for, but it’s almost too simple for me.

Oh, and while I’m talking about Google … why won’t they let me put my iGoogle tabs back on top of the page instead of on the left? It’s a ridiculous waste of space, and it’s even worse on the smaller screen of my EeePC.

Apple iPhone 3GS

After over 13 years of using (mostly) PalmOS and (some) Windows Mobile devices as my PDA and/or cell phone, I now own my first device that runs … OS X. Yep, I got an iPhone.

We’re in the early stages of testing the iPhone with our corporate e-mail infrastructure: Microsoft Exchange and GoodLink. Since my AT&T account has been upgrade-eligible for some time (the last time I “officially” upgraded was when my Treo 650 was the hot new device), my boss told me to go ahead and get an iPhone (16gb model, but I paid a little out-of-pocket to get the 32gb one since my current iPod is 30gb). I need to start learning how to use it so I can eventually support it as we roll the device out to other users in the office. It’s been two weeks now since I abandoned my trusty Treo 680 and I had some free time while on vacation last week to really spend some time with the iPhone. Here’re some of my thoughts …

What I Like

  • the design and form factor: the iPhone is truly a beautiful thing to look at given it’s mostly screen and a single home button. Even with my Otterbox impact case on, it still fits comfortably in my pants pocket. I miss having a physical keyboard (see “What I Don’t Like” below) but the buttons that are present make sense.
  • it’s a widescreen iPod: when music is playing and a call comes in, the music fades away and then the phone rings. When you’re done with the call, the music fades back in, picking up where you left off. One minor nit here, though, is that if you have the e-mail notification sound enabled, your music will fade briefly to play the mail sound, which isn’t necessary (the notification should just be suppressed). I replaced my old Belkin Tunebase FM with the new version for the iPhone so I can charge the device in my car and still listen to podcasts while driving. It includes a speakerphone for handsfree and a single button that works like the home button on the phone: click once to pause/play, twice to go forward a track, twice and hold for fast forward, three times to back a track, thrice and hold for rewind. I like being able to turn the phone sideways and watch video podcasts in widescreen too (although scrolling through podcasts is uncharacteristically choppy).
  • the GPS: using the built-in GPS and compass for location-based/direction-based services is really slick. Pulling up Google Maps and watching the blue dot move along a highway as I drive is like a scene out of a spy movie. Check out Yelp’s monocle feature for a perfect example of augmented reality using these features.
  • the camera: I’ve been stuck with the VGA (640×480) camera in my PalmOS devices for so long! It’s great to finally have a mega-pixel camera (with video even!) that takes pretty good pictures. I love the geo-tagging feature too.
  • the speaker: being able to play music without headphones or external speakers is a definite plus.
  • oh yeah, it’s a phone: when held up to your ear, the screen turns itself off. Take it away from your ear, and the screen fades back into view. You don’t have to navigate through a voice response system to record your voicemail message or retrieve your messages, just tap the buttons on-screen. It’s those little things that continue to impress me. Of course, I haven’t actually used it a lot as a phone since it does so much other cool stuff.

What I Don’t Like

  • the keyboard: no one can argue that the iPhone’s virtual keyboard is better than then Treo’s. Typing on glass just isn’t the same. I’m getting better at two-thumbing it, but I still find typing (quickly) a frustrating exercise.
  • iTunes: I haven’t looked into this much yet, but having to use iTunes to sync and customize the phone is a pain, especially if you’re using more than one computer. For example I sync my iPhone with my main desktop machine at home. While travelling over Thanksgiving, I had my laptop with me, but could not use iTunes on it to manage my phone. This is really going to be a pain at work when I’m trying to configure multiple iPhones for people in the office. I found the iPhone Configuration Utility but still need to read up on enterprise deployments.
  • syncing (or lack thereof): requiring iTunes also makes it difficult for applications to sync their data for backup. Palm had HotSync and conduits which allowed third-party developers to create custom “tunnels” in HotSync that were basically transparent to the user. To sync my eWallet desktop with my iPhone data, I have to open each application (on my PC and the phone), and then start the sync over WiFi (totally outside of iTunes). A kludgy workaround due to Apple’s control freak design. Even the photos and videos you take on the iPhone don’t sync down to your PC through iTunes, instead you have to use the built-in features of your PC since the device appears as a plain storage device (although you can sync certain folders of photos back to the iPhone from your PC if you want to carry a certain collection around).
  • I miss the clickwheel: using my iPod in the car without looking was pretty easy with the clickwheel. I was even pretty good at skipping most commercials (half a turn on the wheel was about 30 seconds). The iPhone isn’t as easy since it doesn’t have a lot of buttons. Yes, you can use the home button to skip tracks, or FF/RW, but for more accurate positioning you have to use the on-screen scrubber with your finger, which is pretty dangerous to do while driving.
  • lack of customization options: sure I can drag the app icons around to different pages, but I can’t rename them, can’t leave empty spaces on the grid, can only assign a few different options to the home button, etc. Sure, I could mess around with jailbreaking and probably address some of those concerns, but I need to be able to support this device at work so I can’t deviate too much from the delivered experience.
  • battery life: forgive me … I’ve been using a Treo on the Edge network for almost 4 years and battery life was pretty darn good. I’d only have to charge it overnight and it was good for all day. 3G and all the other cool stuff I can do on my iPhone really sucks the battery dry quickly. When I had my separate iPod and Treo, it didn’t matter if my iPod died while listening to music during the day since my phone still worked. Now that I have this single device I need to be more careful about making sure I keep it charged. The lack of a user-replaceable battery is a downer too. It’d be nice if I could just buy a new battery and put it in myself instead of having to send the whole phone back to Apple for a “repair.”
  • fingerprints: it really sucks that 5 seconds after taking this beautiful shiny piece of technology out of the box it’s covered in my greasy fingerprints. The matte finish screen protectors I got at the AT&T store do a decent job of hiding them, though, and make the screen a lot less reflective and not so glassy to the touch.
  • it’s delicate: this will take some time to play out, but the Treos were solid. Not that I drop my phone a lot, but when I do, it’s usually in a bad way. The Treo might have gotten scratched or scuffed, but it kept on working. Little plastic tanks. I’m not so sure about the iPhone. I already dropped it once onto concrete but luckily I have that impact rubber case and it landed screen up. The folks in the office are pretty hard on their devices (based on the drawer full of broken phones in my desk) so it’ll be interesting to see if the iPhone is up to their abuse.

What Apps Do I Use?

There’s an app for everything, right? Another of the big draws of the iPhone is the thousands of applications available in the iTunes App Store. One of the first things I had to do was find iPhone equivalents of the applications I used on a daily basis on my Treo. Here’s what I’ve got so far.

  • What I used on the Treo: eWallet
  • What I switched to for the iPhone: eWallet ($10 for iPhone, or $20 usable on multiple devices including PC)

Like anyone, I have a lot of passwords, logins, and various personal private information I need to carry around with me. To keep all of this sensitive information secure and portable, I’ve used Ilium Software’s eWallet application for many years. Luckily this switch was easily since Ilium has PalmOS, Windows Mobile, PC, and iPhone versions of  eWallet, and now I’ve used them all. Migrating my data was simple, although synchronization between the desktop and iPhone versions is a little cumbersome since you have to initialize the sync on both devices at the same time over WiFi. Still, being able to access all of my passwords, accounts, and other stuff I store in my wallet on the iPhone is great.

  • What I used on the Treo: ListPro
  • What I switched to for the iPhone: Evernote (free)

I also keep a lot of random information on my handheld: gift ideas, vacation days, clothes sizes, various house information/measurements, lists of all sorts! So Ilium Software’s ListPro was another application I relied heavily on, using it both on my Treo and desktop PC. Unfortunately, Ilium hasn’t produced an iPhone version of ListPro yet so I had to search for alternatives. I ended up trying Evernote, which has iPhone and PC versions (in addition to many more, including via a web browser). Evernote requires you to create an account on their website, so technically your notes are being stored on their servers and then synced with your different devices. You can store text, images, documents, etc. but keep in mind the only notes you can actually edit on the iPhone have to be plain, unformatted text (so no checkboxes, bullets, etc.). Creating notes on the iPhone has the benefit of automatic location tagging, using the phone’s GPS. The basic free service has a limit on how much you can upload a month, so there’s a premium service you can pay for without those limits and also includes things like extra security. I had to manually copy/paste all of my lists out of ListPro into Evernote, which was a bit of a pain, but it did give me the opportunity to clean up and re-organize some of my lists.

  • What I used on the Treo: Tasks (GoodLink)
  • What I switched to for the iPhone: iMTasks (no longer available, replaced by iMExchange 2)

With GoodLink on my Treo, my e-mail, contacts, calendar, tasks, and notes from Outlook were all synchronized in near real-time. The iPhone handles the e-mail, contacts, and calendar, but not the to do list or notes. I am a heavy user of Outlook tasks so I really wanted those synced to my iPhone. For whatever reason, Apple decided not to bake that in. Instead, I had to purchase RERLSoft’s IMTasks app. Once I entered my Exchange information, the app downloaded my to do list and keeps it synchronized (although only while the app is open). Hopefully the forthcoming GoodLink client for the iPhone will include this (update, 07/2012: almost three years later and it’s still not part of the Good app), but for now this was a must-purchase function for me. RERLSoft has a version that includes Outlook notes synchronization (and also allows you to manage your out-of-office setting), but since I’m using Evernote now I decided to stop using Outlook notes altogether.

  • What I used on the Treo: TealAuto
  • What I switched to for the iPhone: Gas Cubby ($5, free lite version available)

Some other data I keep on my phone is car information: gas mileage, repair history, etc. On my Treo I used TealPoint’s TealAuto application to store and track fill-ups, repairs, maintenance, etc. Without an iPhone version, I tried out a few of the vehicle apps in the App Store, including the free “lite” version of Gas Cubby and eventually ended up purchasing the full version. Using the Windows version of TealAuto, I was able to export all of my data from my Treo into a CSV file. Then, using App Cubby’s unsupported import feature, I was able to load it all into Gas Cubby. The import only supports gas events, though, not maintenance, so I manually entered our 2009 maintenance events into the app later (not a big deal since there were a lot less of those compared to fill-ups). If you’re a multiple iPhone home and purchase multiple copies of Gas Cubby, you can even keep the data synchronized across devices, which is a cool feature.

  • What I used on the Treo: iSilo
  • What I switched to for the iPhone: Stanza (free)

If you read this blog you know I do a lot of reading on my PDA. There’s not a version of iSilo for the iPhone so I had to try out a few free e-readers. I settled on Stanza. Using the desktop version, I was able to convert the book I’m reading from the Baen free library from HTML into a format for the Stanza reader and transfer it to my iPhone. Having the larger, higher resolution screen on the device is great for reading. Plus you can change font sizes, colors, and themes (black on white, white on black, textured, etc.). I’ve also installed Amazon’s Kindle Reader (free), in case I decide to purchase some new e-books. No need for a Kindle now! Interesting, though, that Stanza is actually owned by Amazon. I wonder if eventually they’ll combine these apps?

  • What I used on the Treo: tussh
  • What I switched to for the iPhone: iSSH ($5), iRdesktop (free)

Why do I like remoting into my Linux server from my phone? Because I can, of course! iSSH let’s me login to my Ubuntu box at home via command-line or tunnelled VNC. The free iRdesktop utility lets me connect to my Windows servers at work when I have my iPhone connected to the VPN. Amazing. There’s even a free Citrix client (but I haven’t gotten it to work properly yet).

  • What I used on the Treo: iRogue
  • What I switched to for the iPhone: Rogue (free)

My daughter loves playing iRogue on my Treo and I like it too, so of course I needed the iPhone version! 😀

Some other apps I’ve purchased/installed include:

  • iEmergency+ ($1) allows you to store your emergency contact information (phone numbers, medical info, etc.) in a single place and also has a helpful utility for adding ICE information to your iPhone’s lock screen.
  • Using VIP Access (free) means I don’t need to carry around my PayPal football or VeriSign Secure Card since my iPhone can now act as my security token.
  • The iPhone doesn’t allow for multiple e-mail signatures when you use multiple e-mail accounts. JohnHancock ($2) lets you create and switch between as many as you need. There doesn’t seem to be an elegant solution, but this app at least provides one.
  • RedLaser ($2) is an amazing barcode scanning application. Point your iPhone’s camera at any barcode and the app will pull up a list of prices from other stores. The latest update even uses the GPS to find local prices. If nothing else, it’s fun to play with.
  • Chess with Friends (free) and Words with Friends (free) from New Toy, Inc. are basically chess and Scrabble games you can play “online” with other iPhone users. Really cool for playing with friends or relatives who live far away. We used both of these games in the car on our recent Thanksgiving holiday trip to play games without having to pass a single iPhone back and forth. 😉

What Do I Think?

The iPhone is a really slick device. The first few days were rough for me, since I was really set in my ways with my Treo and doing things in a certain way. Over the past two weeks, though, as I’ve had time to get better acquainted with my new shiny toy business tool, I have to admit it is a well engineered piece of hardware and software. Now I have a single device that really covers all the bases. Pretty incredible.

Got any other must-have/must-try apps for me, or other iPhone advice, tips, or tricks? Leave me a comment!

If you already own Wii Fit, get Wii Fit Plus

While I continue to wait for the delivery of my FitBit I picked up Wii Fit Plus last weekend.

Wii Fit Plus is basically an upgrade to the original Wii Fit that came with the balance board: it contains all of the original games and activities, then adds a bunch of new games (Training Plus) and features. It will automatically import all of your data from Wii Fit so you won’t even need your old disc anymore. So, what’s new and cool?

First off, you can now create profiles for babies and pets. Why? Well, I guess if you want to be able to track the weight of those smaller members of your household it can come in handy. Like in Wii Fit, the balance board weighs you first, and then you holding your dog, cat, or baby to calculate the difference. It’s kinda cute to see our dogs in the Wii Fit Plaza.

A new “multi-player” feature is available from the Wii Fit Plaza which allows a bunch of people to alternate playing the mini-games, but none of it counts towards Wii Fit credits. I guess it’s just a way to allow your guests to try out the games without needing to create a profile, get weighed in, etc.

One new feature I was looking forward to was the addition of routines, basically “playlists” of activities that was supposed to streamline performing multiple exercises in a row without all of the pausing and clicking. Unfortunately, you can only add Strength Training and Yoga activities to a routine, not any of the Aerobics or Balance activities. Also, you’re limited to a certain number of reps. For example, instead of having the option to add 5, 10, or 20 push-up and side-plank reps, you can only choose 6 at a time. To work around this you’d have to add multiples of the 6-rep activities in a row:

Once you do have the routine set up, though, it definitely makes performing multiple activities more efficient. You don’t need to keep clicking the A button a bunch of times to move on, you just see a brief checklist and then the next activity starts.

Wii Fit Plus also assigns METs (Metabolic Equivalents) to activities so in addition to showing you the number of minutes you’ve exercised (Wii Fit credits) it will also calculate the number of calories you’ve burned. New options in the Activity Log also let you track your waist size and the number of steps you’ve taken during the day (assuming you have a pedometer to track that data for you … this is where my FitBit will eventually come into play).

The new Training Plus games are a lot of fun too! Cycling, Segway riding, snowball fights, the obstacle course, and many more new additions can really get you back into Wii Fit if you’ve been getting bored with the old activities.

So, if you bought Wii Fit give Wii Fit Plus a try … it’s definitely worth the $20 (or less, if you shop around).

Kickstarting the Karmic Koala

Last week, Ubuntu 9.10 (Karmic Koala) was officially released so over this past weekend I went ahead and upgraded my server to the new version. As with my prior upgrades, I ran the process remotely over SSH (my server is a headless box sitting in a closet) and it was very smooth. The only minor problem I had was the initial download of the required packages failed, but I suspect that was because the Ubuntu site was being slammed with everyone downloading the new software. I restarted the upgrade several hours later, the downloads completed and the upgrade proceeded. After the release upgrade was done, I only had to put back a few minor tweaks and customizations (such as disabling IPv6), do a quick reboot, and the box was back in business.

I also grabbed the release version of the Netbook Remix since I had installed the beta on my EeePC earlier last month. I wasn’t able to get it to install, however: the system booted just fine from the USB drive where I extracted the ISO, but the installer would crash almost immediately with the following error: “Cannot mount /dev/loop1 on /cow.” I found this thread on the EeeUser Forums that seemed to think it was a problem using Ubuntu’s own USB creator utility to “burn” the image onto the thumb drive. So I used unetbootin to re-image the drive and that fixed the problem! Strange that Ubuntu’s own utility would have a problem like that.

Ubuntu 9.10 netbook remix

Jolicloud just wasn’t cutting it for me, so now that the beta of Ubuntu 9.10 (Karmic Koala) has been released, I’ve put it on my EeePC 4G Surf (the fourth distro I’ve run on that netbook this year). Ooooo, pretty:

Ubuntu 9.10 netbook remix

I haven’t had a lot of time to play/tweak, but so far all the important stuff (wireless, Fn keys, sound, etc.) is working.

Testing Windows 7 RTM and XP Mode

I’ve been using the release candidate of Windows 7 at home for the past few months but now we’ve started testing Windows 7 at work. This past week I “upgraded” my laptop and desktop at the office to the RTM version of Microsoft’s latest operating system. Actually, both were clean installs since they were previously running Windows XP (you can only do a true upgrade from Vista).

Installation

My main work machine is an older Sony VAIO laptop (Core Duo 2.0GHz, 1gb RAM, 80gb HD). To prepare, I ran the File and Settings Transfer (FAST) wizard in XP to back up all my documents and settings to my external hard drive, which took a long time. Then I ran the Windows 7 installation from the DVD within XP. The basic install took just about 90 minutes.

Once I was logged into my fresh new install, I ran the Windows Easy Transfer (WET) utility to restore my saved settings from XP. What I learned, however, is that I had misread the “upgrade” instructions. I was supposed to run the WET wizard from the Windows 7 installation media to back up my XP settings because the backups created by FAST are not compatible with WET (it’s meant for upgrading from XP to Vista)! Thus, after my clean install, I was unable to restore my documents and settings. I ended up working around this by restoring my FAST backup to a spare XP laptop and then using WET from the Win7 DVD to back up the settings again and finally transfer them back to my laptop.

Also, I chose not to re-format/re-partition my drive during the installation of Windows 7. The result of that was Windows 7 went into the standard C:\Windows location and the installer moved the old C:\Windows, C:\Program Files, and C:\Documents and Settings folders to C:\Windows.Old. Thus, I was able to retrieve all of my documents from there as well, in addition to retrieving some settings and files not handled by the WET utility.

If you’re “upgrading” from XP, the only benefit you get by using the WET utility is an easy (but not quick) method to transfer your documents and files (but depending on how much you’ve got to save, you may need a pretty large external drive). There aren’t that many “settings” that get transferred, from what I could tell, other than your actual account setup. You do get a nice report from the wizard, however, that shows you what applications you might need to re-install along with what was transferred. So if you’re going to format/re-partition your drive before installing Windows 7, WET is the way to go. Otherwise, I say just copy your stuff out of C:\Windows.Old after the install is complete and don’t worry about taking the extra time to back all that stuff up to an external drive (unless you want a backup just to be absolutely safe).

Drivers

After the initial install, I had basic SVGA (800×600) resolution and no Aero glass effects, as the installer did not find a suitable driver for the nVidia GeForce Go 7400 card in my laptop and the Experience Index was 1.0 due to low scores for the Graphics/Gaming Graphics items. The Windows 7 driver package (beta) from nVidia’s site did not contain a driver for the card either. I tried using the Vista driver package, but when I ran the setup program it told me a compatible adapter could not be found. Argh! I eventually was able to go into the Device Manager and manually update the driver, pointing it to the directory where the nVidia installer had extracted the Vista drivers. This gave me back the ability to use the native 1280×800 resolution on the laptop panel and also turned on all Aero Glass features once I re-ran the Experience Index (which went up to 3.5, still hampered by the low scores for graphics).

Most of the internal laptop hardware seemed to be functional, like the built-in wired and wireless network adapters, but I still had a few “Unknown Device” items listed in Device Manager. One turned out to be the built-in webcam and the other was the Memory Stick slot. The Windows 7 driver wizard was able to point me to the proper drivers directly on Sony’s web site to get these working, which was nice. My first run of Windows Update also pulled down a driver for the biometric device (fingerprint scanner).

Not every driver worked properly, though. Since the Sony Notebook Utilities wouldn’t install, I can’t use the Fn keys to control screen brightness, volume, LCD/VGA output switching, etc. I’m also missing the switcher utility that allows me to independently turn off the wireless G and Bluetooth radios. Sony’s Windows 7 page for the VAIO just says to check back once Windows 7 is officially released, so I’m hopeful this annoyance will eventually be resolved.

Post-Installation Configuration

I had made a list of everything installed on my laptop before I started this process, but it still took a lot of time to re-install everything and tweak it all back to just the way I liked it (Start Menu configuration, shortcut keys, shared drives, network printers, etc.). While annoying, this gave me the chance to leave out all of the stuff I hadn’t used in a while. Once I was done, I removed the C:\Windows.Old folder to free up the disk space.

XP Mode

I wanted to try XP Mode in Windows 7 to see if I could use it to run some of the older programs we use in the office in a virtual machine. I downloaded and installed it from Microsoft’s site, but ran into a problem when I tried to run it on my VAIO due to a lack of hardware virtualization. Apparently Sony hasn’t enabled hardware virtualization in the BIOS of any currently shipping VAIO even though the processors support it, so Virtual PC will not run.

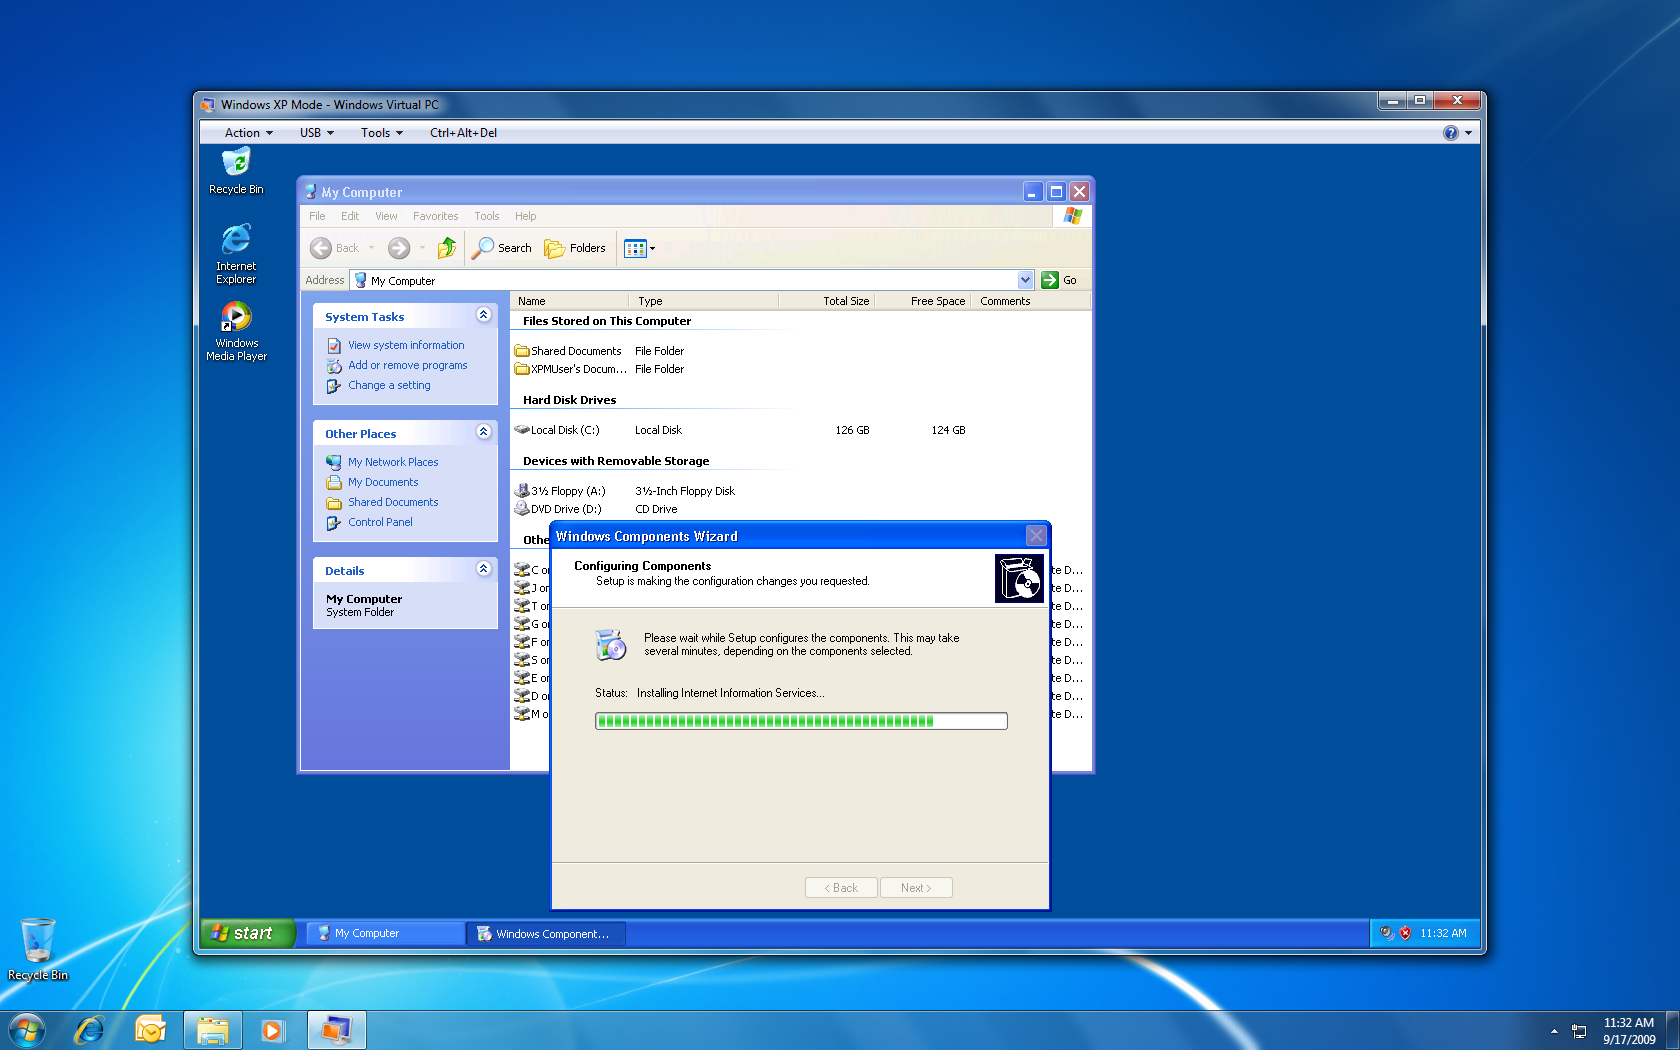
Luckily, I was able to enable hardware virtualization on my desktop (on which I had also done a clean Windows 7 install). Once you have the XP virtual machine running under Windows 7, you install your “legacy” applications normally (inside the virtual machine). For example, in the screenshot below I was adding IIS:

XP Mode in Windows 7

Windows 7 creates corresponding shortcuts for the applications under the XP Mode folder on the Start Menu of your PC (you can also add your own custom shortcuts to that folder by simply creating them under the All Users Start Menu within the virtual machine). When clicking on one of those icons, the application runs seamlessly on the desktop so the user is not even aware the application is being virtualized (except for the old XP Luna-style interface instead of the new Aero glass look). Using XP Mode, for example, I was able to successfully install NetMeeting (which I need to connect to the voicemail system console). It ran just fine “on” Windows 7, with almost no noticeable impact on performance.

It requires a little bit of advance setup but XP Mode seems to be a good way of running any legacy applications that won’t work natively under Windows 7 (assuming the user’s PC supports hardware virtualization, of course).

Jolicloud on my EeePC

Jolicloud transforms your netbook into a sophisticated web device that taps into the cloud to expand your computing possibilities. The web already hosts a significant part of our lives: mails, photos, videos, and friends are already somewhere online. Jolicloud was built to make the computer and web part of the same experience.

I’ve been playing around with Jolicloud, which touts itself as an “internet operating system,” on my EeePC 4G Surf for the past few days. Here’s a brief review.

Installing Jolicloud on your netbook is pretty straightforward: you download the ISO image and then use their USB Creator tool to “burn” that image onto the install media of your choice (ex., a USB thumb drive or SD card). I did have some issues with the USB Creator not recognizing my 1gb thumb drive (running under Windows 7) so I ended up using unetbootin instead (it looks like a newer version of the USB Creator has since been released which might address that problem, plus there are the older manual instructions). Next, you boot your netbook from that thumb drive, click through a few setup screens, and before you know it you’re logging into your fresh new Linux distro. There’s a good overview of the installation process (including screenshots) here.

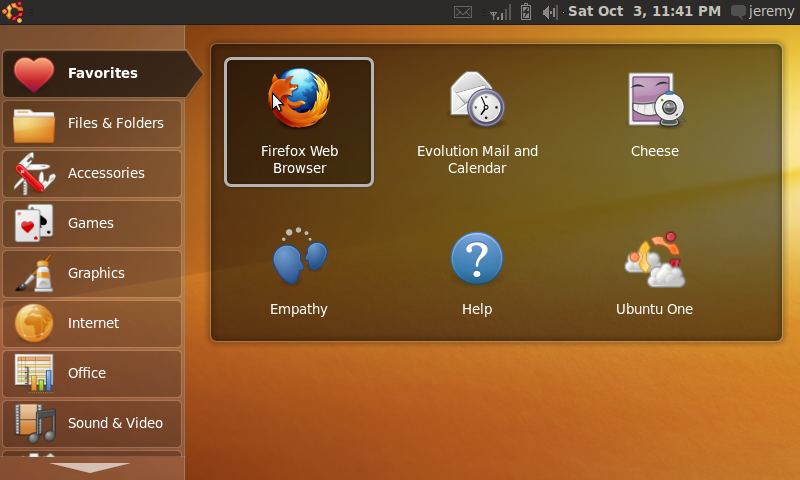
Jolicloud is based on Ubuntu 9.04 and uses the default Netbook Remix interface:

the netbook remix desktop

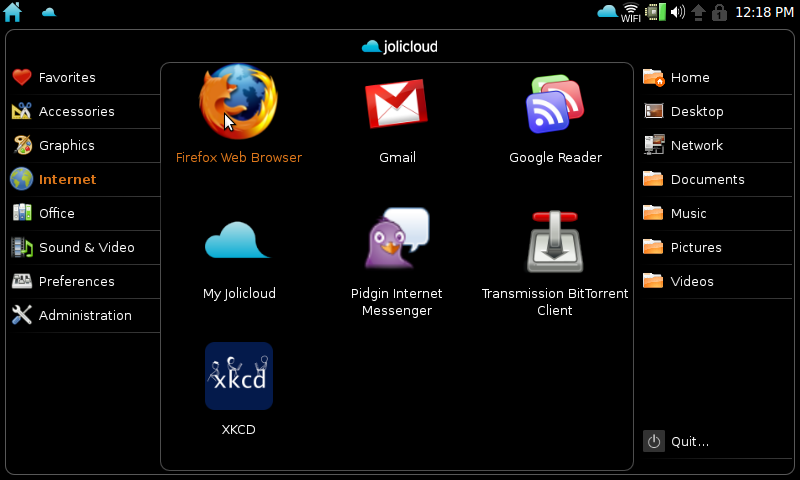
Fire up the Jolicloud application, however, and the “internet operating system” portion kicks in:

Jolicloud desktop

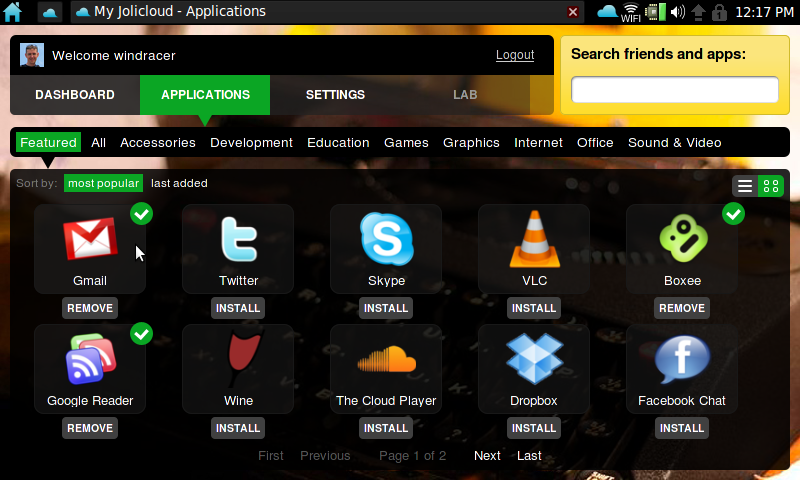
From here you can easily install other applications, most of which are “web apps” like Gmail, Google Reader, Twitter, Facebook, etc. What’s a little strange to me is that when you “install” one of these apps (like Gmail), you get an icon back on the netbook remix desktop to launch it (notice the xkcd icon on my first screenshot above). All it’s really doing is opening a web browser directly to that particular site, but Jolicloud (via Mozilla’s Prism) makes it look like an actual app instead of a web page. Thus, you won’t see the normal Firefox menu or toolbars, no browser favorites, etc. I’d rather just use Firefox directly with multiple tabs open, but I can see how this approach might make a netbook more user-friendly for the non-techie type (not to mention freeing up some valuable screen real estate on smaller netbooks).

I even managed to get Hulu running, which was impressive considering the problems I’ve had with Flash-based video on my Eee in the past. To be honest, though, I had never tried the Hulu site on my Eee before. At any rate, I watched the pilot episode of “Alf” on my tiny 7″ screen without any problems. Not exactly a 10-foot interface. 😉

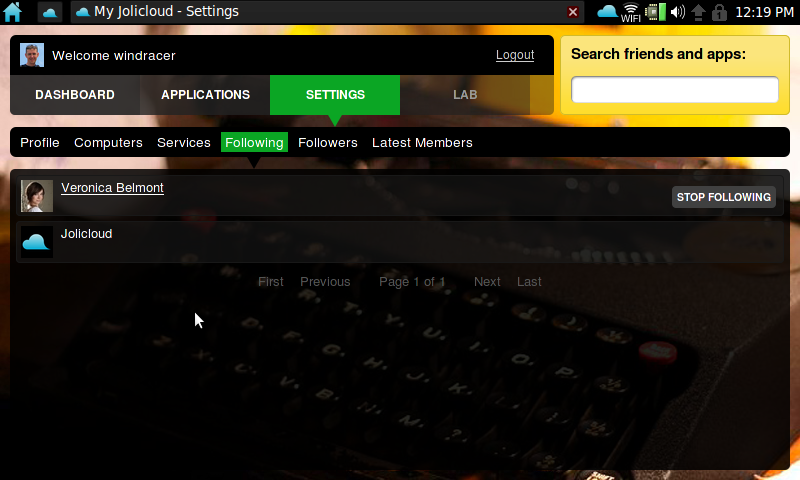
Jolicloud has a big focus on social networking, so you can “follow” other Jolicloud users and see updates on what they’ve installed or are doing with OS:

following other Jolicloud users

Personally, I’m not into the whole social networking culture (i.e., I don’t have a Facebook page and don’t use Twitter) so this part of Jolicloud’s interface doesn’t really appeal to me. I don’t want people “following” me or seeing what apps I’ve installed, but I can’t find any privacy settings that allow me to turn that stuff off, either.

Which brings me to documentation: Jolicloud is still in private alpha testing but there seems to be a lack of any documentation, and there’s no depth to the wiki (which seems to only be one page). For support you’re just directed to Twitter, Facebook, IRC, or their GetSatisfaction page. That being said, when I sent an e-mail to [email protected] about my trouble with the USB Creator, I did get an actual response relatively quickly.

So it still has a little ways to go, but Jolicloud is shaping up to be a great alternative cloud operating system for your netbook.

Cookin’ up some Wii homebrew

I saw this post on Lifehacker yesterday about installing homebrew on the Wii without needing to use the Twilight Princess hack and decided, what the heck, let’s give it a try!

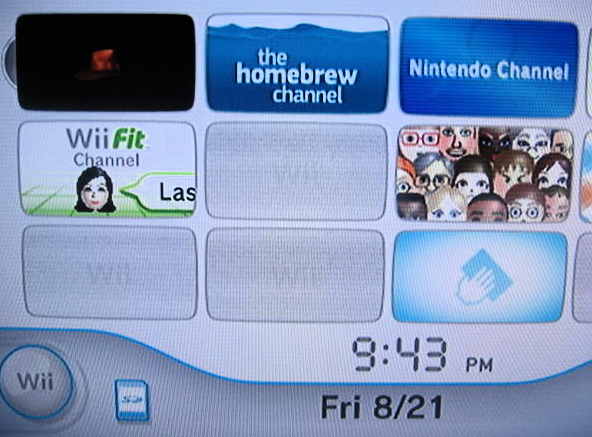
Wow, talk about amazingly simple. Only minutes after downloading the necessary files, I had the Homebrew Channel running on my Wii.

Homebrew Channel

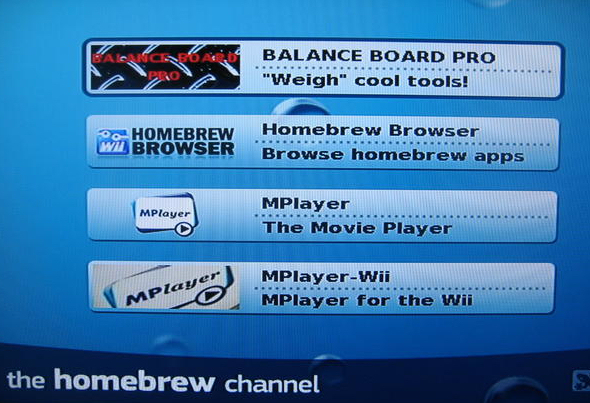
After doing a little more browsing and downloading, I had a few homebrew apps to play with.

homebrew apps

Pretty slick. Using MPlayer I was able to play both a commercial and self-created DVD using the Wii remote for the basic controls. I’ll be honest, DVD playback on the Wii isn’t going to replace a standalone DVD player yet, but for a homebrew app, it’s pretty cool. Nintendo really should just build that functionality in! With MPlayer-Wii I was able to stream an .AVI video off of my NAS (via samba) for playback through the Wii. I hard to hardcode the filename in the configuration file, so this isn’t a complete video library solution (like what I do with my TiVos) but the possibility is there.

I played around with a few homebrew games like Duck Hunt, and plan to check out Quake and Doom. For now, as you can see from the screenshot above I’ve kept the Homebrew Browser (which allows you to install apps right from the Homebrew Channel instead of having to use your PC to download and then copy them to the SD card) and Balance Board Pro which shows off some of the features of the Wii Balance Board.

Cool stuff!

Trillian Astra is Gold

The developers over at Cerulean Studios announced today that with Build 117, Trillian Astra (for Windows) has gone gold. You can download the free version here.

I’ve been using the beta on Windows 7 for the past four months and am pretty happy with it (I’ve been a paid Pro user since 2004 and have upgraded to the Pro version of Astra as well). I still have one random problem where sometimes if I initiate a conversation with someone on Yahoo, they won’t get my messages, but if they start the conversation we can chat back and forth just fine. The random crashes seemed to have been fixed as well (at least, I don’t think I’ve had one since I got Build 117 a few days ago).

So if you’re looking for a good multi-service IM application for Windows and have been scared away from Digsby, give Astra a shot.

I’ve been Joliclouded!

Since my 900A is now my “main” netbook, I’ve been using my older 4G Surf to experiment with other distros. Last week I gave Tiny Core Linux a try: it’s only 10mb in size and loads entirely into RAM, leaving the 4gb SSD free for storage (and applications). It was definitely fast, and a neat idea, but it wasn’t the type of netbook experience I was looking for.

Tonight I got an invite to the alpha test of Jolicloud, another Ubuntu-based operating system targeted for netbooks. It’s pretty slick looking so I’m looking forward to trying it out. I’ve got the ISO downloaded and will post again once I have the chance to install it on my Eee and play around a bit.

Also, I haven’t watched it yet, but today’s episode of Tekzilla (#101) has a segment on Jolicloud.