Unless you’re not interested in tech news or have been under a rock for the past two weeks, you’ve probably heard about the latest LastPass breach debacle. Two days before Christmas, every LastPass customer like myself received an e-mail informing us that, in a nutshell, back in August 2022 an unauthorized third-party had acquired LastPass vault backups from a cloud service. But don’t worry, they said! As long as you’ve got a strong master password, you should be fine. But not everything in your LastPass vault is encrypted, specifically URLs and now that this unknown threat actor has a list of LastPass customers, their vaults, and the URLs in those vaults, let the phishing attempts begin! Not to mention they have time to brute force the encryption on those vaults with poor master passwords. Even worse, since the initial announcement, there has been zero further details provided by LastPass, even on their own support forums (which are now full of message threads with other angry customers also leaving) and no mention of the breach at all on their homepage!
So yeah, after 12 years as a LastPass Premium/Families customer, I’ve switched.
I’m just going to focus on my own migration here. There’s lots of good analysis available on the breach, its impact on LastPass customers, and how to protect yourself. I spent a lot of time last week changing all my critical passwords and 2FA codes but do your own homework (I recommend listening to Steve Gibson’s Security Now! podcast, episodes #904 and #905).
There are lots of password managers out there but having been a LastPass customer since the early days (July 2010), I didn’t really pay much attention to them since I wasn’t interested in switching and was happy with my current setup (and intertia is hard to overcome). That all changed right after Christmas when I received that e-mail and started reading about the resulting fallout on the internet. After doing a bunch of research I narrowed my list down to 1Password and Bitwarden. Then taking it a step further, I started investigating the possibility of self-hosting and ended up choosing Bitwarden/Vaultwarden.
Bitwarden
Bitwarden is a password manager with basically the same offerings as LastPass: a web vault/cloud service, mobile app, and browser extension with free, premium, and families subscription options. The premium service ($10/yr) adds advanced multi-factor authentication options, the Bitwarden authenticator, and file attachment storage. The families option ($40/yr) gives you six accounts with all the features and sharing of the lower tiers. Unlike LastPass, however, Bitwarden is open-source and has an option to self-host, meaning instead of relying on Bitwarden’s cloud servers to host your vault, you can run the server yourself. Now the average user isn’t going to self-host, but for an IT guy like myself, moving my critical password stuff onto my own was appealing: since my vault wouldn’t be stored on a third-party’s server(s) in the cloud, it wouldn’t be part of a breach like what happened to LastPass. Instead, my own server would need to be compromised. Obviously, this also means that securing the installation, maintaining it (i.e., patches and upgrades), and making sure it’s backed up is also my responsibility, but that’s all something I’m capable of doing.
Vaultwarden
Even running the server yourself, though, you still need to pay for a subscription if you want those additional features. Enter Vaultwarden (formerly bitwarden_rs): an “alternative implementation of the Bitwarden server API written in Rust and compatible with upstream Bitwarden clients, perfect for self-hosted deployment where running the official resource-heavy service might not be ideal.” It’s only missing a few features from the main Bitwarden server (and none of them were anything I cared about anyway) and since it’s a fork of the primary open-source project, you don’t need a subscription for any of the premium features. Basically you use Bitwarden’s mobile app, browser extensions, desktop apps, etc. to connect to your own Vaultwarden instance running on your own server instead of Bitwarden’s cloud servers (which is what they’re charging you for). Now, the Vaultwarden community does encourage supporting Bitwarden so that they continue to develop the product which in turn keeps the Vaultwarden project going (I’ve donated to both).
Install
The preferred method of installing VW is using a Docker container. I had played around a little with Docker in the past but never seriously so this was a good opportunity to learn. At first I figured I could set it up on my NAS but quickly determined that my old Synology DiskStation DS214 didn’t support Docker. Sounds like a good excuse to upgrade, right? 🙂 But while I was waiting for the new hardware to arrive, I proceeded to install docker on my existing Linux server (apt-get install docker-ce docker-ce-cli containerd.io docker-compose-plugin). After confirming the install with docker run hello-world, I then deployed the Vaultwarden container (docker run -d --name vaultwarden -p 8899:80 vaultwarden/server:latest).
Since I already had Apache running on the server, I had to use an alternate port for VW but at this point I was able to hit the login page locally. I couldn’t actually log in though, due to the HTTPS requirement. So the next step was configuring Apache to reverse proxy the traffic to Vaultwarden using my existing LetsEncrypt certificate, something I had previously experimented with back when I was using HomeAssistant so it didn’t take long to set up a new subdomain and then expose the new VW install to the internet (yikes!).
Configuration
With my new admin account created in my own self-hosted Vaultwarden instance, it was time to start configuring. This involved re-creating the Docker container a few times as I tweaked environment variables and setup parameters, like turning on logging, enabling WebSockets for notifications, setting the proper timezone, etc. The beauty of Docker is that the application’s data persists outside of the container so I could re-deploy the Vaultwarden container (the “server”) over and over without affecting my data (my account, vault, etc.). Very slick. Via the administration page, I made suggested changes like turning off signups (to prevent just anyone from creating an account on my server), increasing password iterations (something else LastPass failed to do properly), setting up e-mail, etc.
Outside of the VW container, on my Linux host, I set up the other items necessary for self-hosting like backing up the Vaultwarden database (which contains all the vault stuff!) and other persisted data (like file attachments, logs, etc.). Another nice thing about Vaultwarden is its lower resource requirements: out-of-the box (or container?) it uses the SQLLite database whereas the self-hosted Bitwarden server uses Microsoft SQL Server (although the new unified beta also allows for MySQL and Postgres). This also makes backing up the database simpler, so I just added the necessary commands to my nightly backup script.
I also set up fail2ban on my server as recommended in the hardening guide. This was another new tool for me so it took some more research and debugging to get it set up properly, but after setting up the proper filters and jails I was able to block my laptop’s IP address from the login page after multiple failed attempts. I also set up e-mail alerts so I can be notified when an address is banned. This setup actually helped point out a “flaw” in my network config that I had never noticed before: all internal (home) network traffic going to my internal server was being logged by Apache as coming from the router’s IP address instead of the actual client. This became apparent while testing fail2ban when it blocked all traffic from the router after I failed some login attempts to Vaultwarden from my laptop. At first I went down a rabbit hole of X-Forwarded-For and X-Real-IP headers before I finally figured out it was the port forwarding/hairpin NAT setup in my EdgeRouter. I was able to resolve this by setting up a sort of split DNS in my Pi-Hole so that local traffic wasn’t relying on the router’s port forwarding rules and then the actual client IP address started showing up in the web server logs. How I never noticed this before I don’t know!
Usage
Anyone who’s used a password manager will find the Bitwarden tools fairly straight-forward and intuitive. I’ve never used the desktop (Windows/Mac/Linux) client, even for LastPass, but rely heavily on the mobile app and browser extension. And of course there’s the regular web (browser) vault access. One “quirk” to using Bitwarden’s tools to access your self-hosted server, you need to first tell the tool where your server is. If you just try to log in, the app or extension will be looking for your account on Bitwarden’s cloud servers. So before you log in for the first time, you need to click on the gear icon and then set the URL of your self-hosted instance:
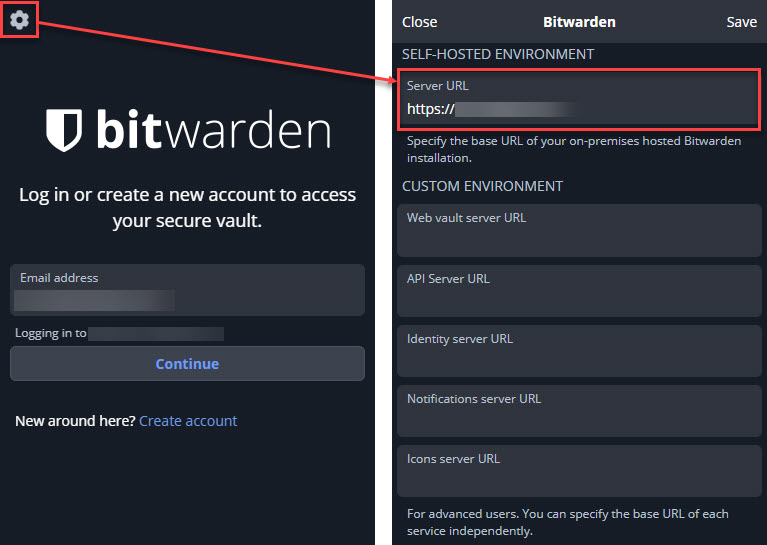
Vaultwarden server config
Then you can log in normally. Now since I had turned off signups, I had to send “invites” to my family members so that they could create their new accounts in Vaultwarden. I also had to direct them to first make the server change so they were creating Vaultwarden accounts and not Bitwarden. I suspect this will cause some confusion initially since I have been calling everything Vaultwarden but really what they are going to see most of the time is Bitwarden.
Once logged in, the mobile app and browser extension work a lot like LastPass: you can view the vault items matched to the current web site you’re browsing, view all of your vault items, generate new secure passwords, etc. The browser extension can also auto-fill logins and offer to save new sites as you create accounts. The password generator can create random passwords or passphrases (like correct-horse-battery-staple) which is a neat addition. There’s also a username generator which I didn’t really understand at first until I learned that it can do “plus addressed” e-mail generation, which is kinda slick.
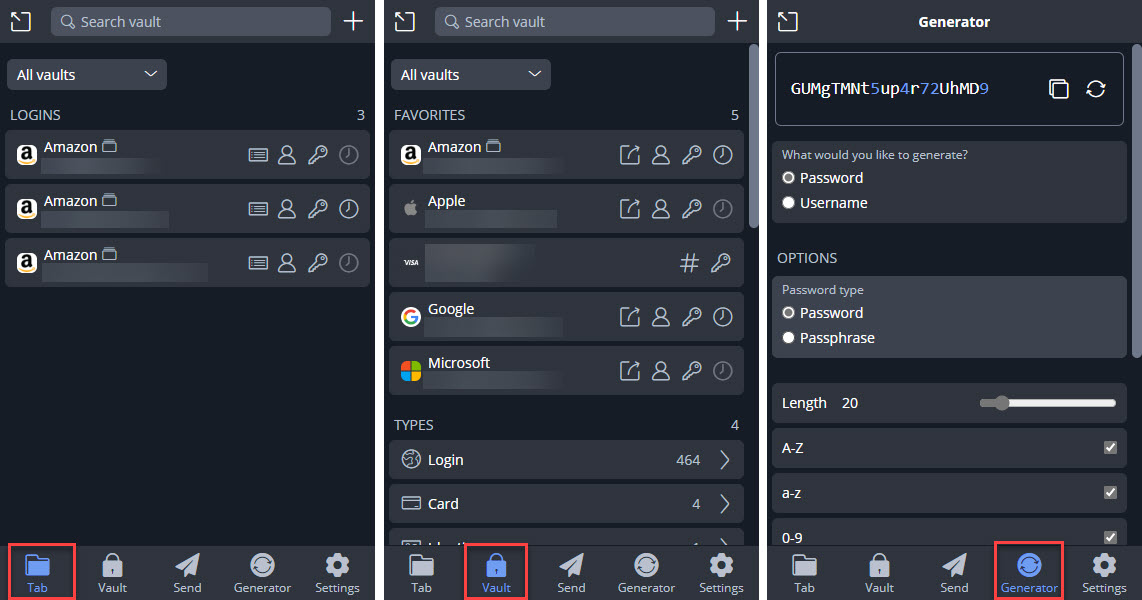
Bitwarden browser extension
Unfortunately there’s no quick way to jump from the browser extension into your full brower vault, you need to manually open a new tab and browse to your server’s URL. This really isn’t a big deal for my family since they stick primary to the apps, I’m the one who typically uses the web vault to edit and organize everything into folders, etc.
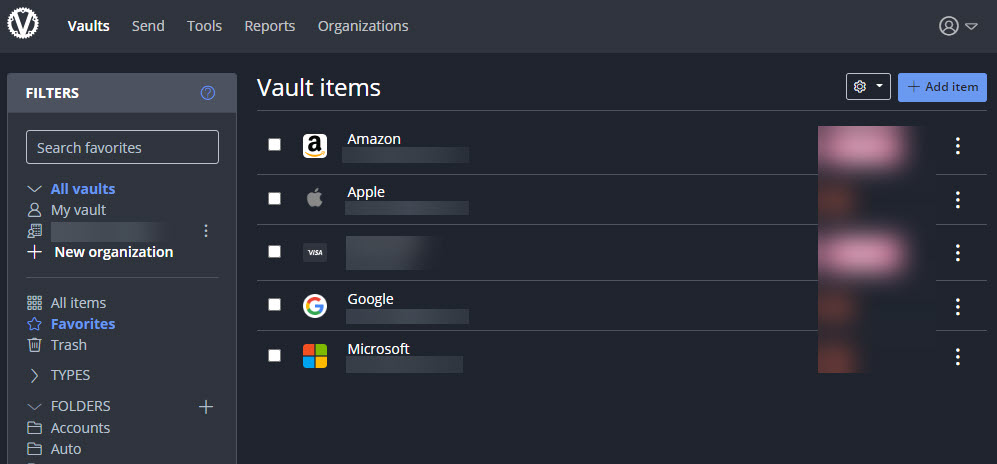
Vaultwarden web vault
If you don’t want to use a separate 2FA authenticator code app, Bitwarden lets you store those credentials right on the vault entry. Now some would say that storing these two factors together in the vault is a security risk, I figure if my vault is compromised the 2FA might not matter much since my vault also has the 2FA recovery codes. And I have to admit the convenience of having the 2FA codes in the vault is pretty nice. In fact, if you associate a 2FA code with a vault item, Bitwarden automatically copies the TOPT code into your clipboard after you log into a site so that all you have to do when the 2FA prompt comes up in the browser is paste and go. I really like this feature and it works the same way on the mobile app. You can turn this off under the Options (“Copy TOPT automatically”) if you’d prefer.
Bitwarden’s search functionality also seems way better than LastPass. In addition to the default basic and full-text searches you can also search by specific indexed field. For example, using >attachments:* in the search field will find all vault items with attachments. That was impossible to do with LastPass.
Organizations & Collections (Families and Shared Folders)
It took me a little while to wrap my head around Bitwarden’s different hierarchy compared to LastPass Families. In LastPass, each member of a family had their own LastPass account and vault. The family organizer could create shared folders and determine the permissions on each folder for each member of the family. Vault items put into the shared folders would then be visible by other family members with access to that folder. In Bitwarden, you have organizations so I created a family “organization” and then invited my family members to join it (again, even though I have signups disabled, the invitation overrides that and lets them create an account).

VaultWarden organization
In an organization you can then have collections, which can be thought of as the individual shared folders from LastPass. At the collection level you can set everyone’s User Type in the organization (family) and which collections (folders) they have access to.
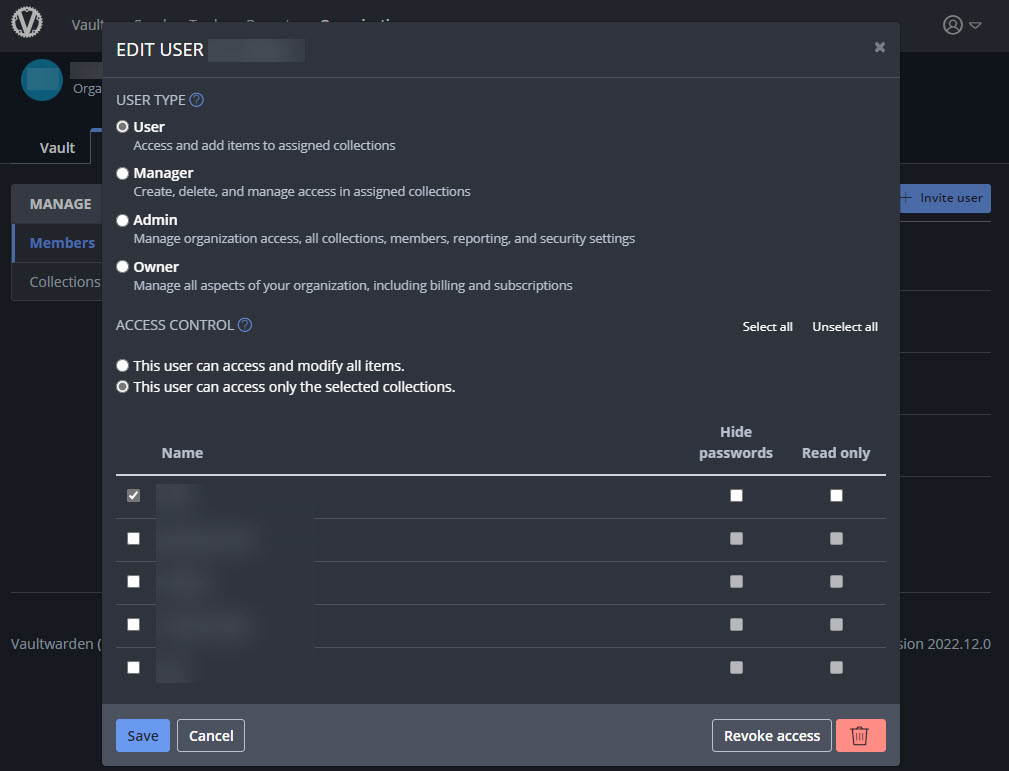
Vaultwarden user permissions
Now, to confuse matters a little further, you can have sub-collections inside a collection. At first you’d think this would be like nested folders in LastPass, but each sub-collection is its own collection and does not inheirit any permissions from the “parent” (because the nesting is just a visual representation). I started out replicating my LastPass shared folder structure as nested collections then realized quickly maintaining individual collection-level permissions was going to get messy fast. Instead, I just created the single high-level collection corresponding to each high-level shared folder in LastPass and set the permissions accordingly. Once that’s set up, family members will see their own personal vault, and then the vaults of any organizations they are a member of. In their vault they will then see any collections in those organizations they have access to.
Shared items in a collection are owned by the organization. A family member with the proper permissions can edit a shared vault item in a collection, but they can’t un-share it (by moving it into their personal vault) without manager or admin rights to the organization. You can also add a shared item to a folder in your own vault to better organize things if you want but it’s still owned by the organization (when viewing items in your vault, it will indicate which vault it belongs to). This can get a little confusing as well but eventually I was able to wrap my head around it (see below for some more quirks around organizations and collections and how I configured my final setup).
At the organization level you can run vault-wide reports like finding passwords exposed publicly in any data breaches, re-used passwords, weak passwords, and even vault items for web sites not using HTTPS. You can also set policies like enforcing 2FA and master password and password generator requirements.
Migration
So how did I transfer everything from LastPass into Vaultwarden? It wasn’t hard but also wasn’t without some challenges.
The first was figuring out how to translate my LastPass family and folders into Bitwarden’s concept of organizations and collection (see section above). I ended up with two organizations (one for my side of the family, one for my wife’s side). In each organization I then created a collection to mirror the high-level shared folder from LastPass. For example, in my family organization I had a collection for my daughter, a collection for my wife and I, and a collection for my parents. I didn’t use sub-collections (I did at first but ended up clearing everything out and starting over with the single collection setup).
The next step was exporting all the data from LastPass and importing it into Vaultwarden. I revoked all permissions from the shared folders in LastPass to prevent anyone from changing anything while I was migrating and then exported the data from LastPass into CSV format.
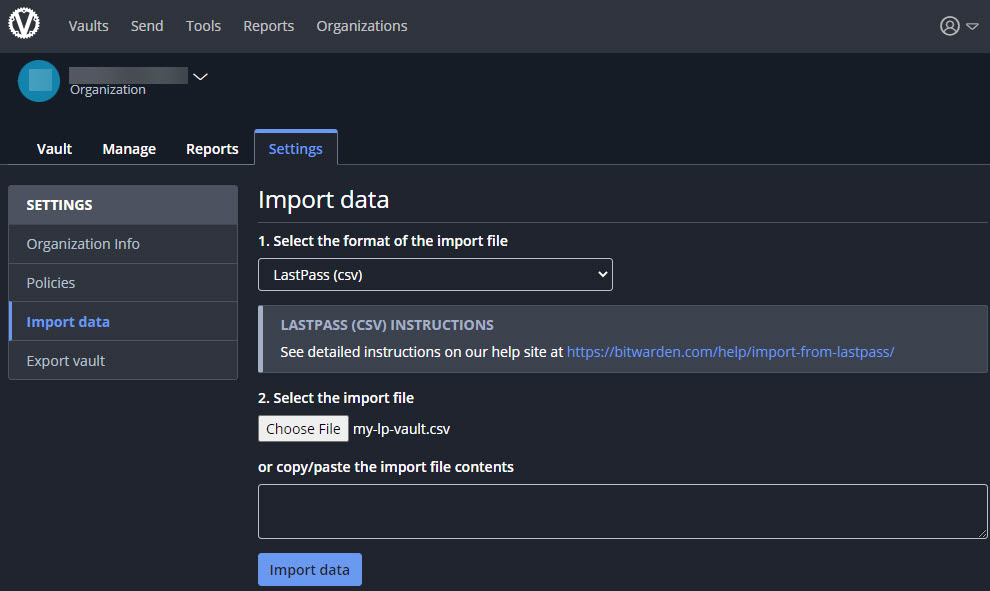
importing from LastPass
You can import into your personal vault or to an organization but here’s another challenge: if you import into an organization, every folder in LastPass becomes a collection in the target organization. At first I didn’t think this was a problem until a) I wrapped my head around the collection/sub-collection permissions thing (see above) and b) worse, there’s no easy way to bulk move a bunch of selected items from one collection into another, it’s one at a time! You also can’t move items between organizations. No way I was going to do that manually so I ended up exporting each new collection using the Bitwarden CSV format (which includes the collection in column A), replacing the collection name with the collection I actually wanted (if necessary), and then importing the file again (to the same or a different organization depending on the target) deleting everything in between to keep it all clean. This was an arduous exercise but I eventually got all the shared items loaded into my new organizations and collections the way I wanted them. One tip here, based on a mistake I made: when exporting from Bitwarden, you’ll want to use the JSON format instead of CSV. If you use CSV, it won’t export Cards (i.e., credit cards) or Identities (addresses).
Exporting from LastPass does not include attachments so if you have any, you’ll need to manually detach them from the items in your LP vault. Unsurprisingly, there’s no way in LastPass to get a list of which entries have attachments, and there’s no visual cue in the interface either! Luckily I found a project on Github (which I forked) that uses the LastPass CLI (on Linux) to find and export all the attachments in your vault using the same folder hierarchy making it easy to determine where they came from. Once I had those extracted from LastPass, I just manually attached them to the same items I had imported into Vaultwarden. And like I mentioned above, you can easily search and find all vault items that have attachments and they even have little paperclip icons next to them as a nice reminder that attachments are present.
Once I had all the shared items loaded and organized in Vaultwarden, I then performed the same export/import steps for everyone’s personal vault items. Then it was just a matter of removing the LastPass apps, extensions, etc. from use and starting use the new system. This also gave me the incentive to go through every item in my vault, change passwords where necessary, clean out old cruft (after 12 years there was bound to be old things I wasn’t using anymore), and basically do a top-to-bottom cleanup and re-organization of my vault. Whew.
Conclusion
It’s now been a week since I completed my full transition from LastPass to Bitwarden/Vaultwarden and I’m pretty happy with the result. Looking back, I can’t believe I continued to deal with all the issues I was having with LastPass, just accepting things because I had been using it for so long. Now that I’ve seen how well Bitwarden works, I’m really sorry I didn’t switch sooner. And the real stamp of approval here comes from my non-technical family members. Yeah, they had to get used to some new terminology and icon colors, but as long as the functionality was the same (or better, in this case) they were happy. I haven’t gotten any complaints yet!
If you were impacted by the LastPass breach, I highly recommend ditching them and moving on. And change those passwords!
I’ve moved Vaultwarden into Docker on my new NAS.
Updated the intro paragraph to also mention this week’s Security Now! podcast (episode #905) that has a lot of more good LastPass info.
Since I set up fail2ban for Vaultwarden, I’ve also expanded my setup to include jails for Apache and WordPress.