Seems like everyone is playing around with ChatGPT from Open AI. Earlier this month when I was working on my NAS re-org I actually tried using it to help me write some firewall rules and this is what I got:
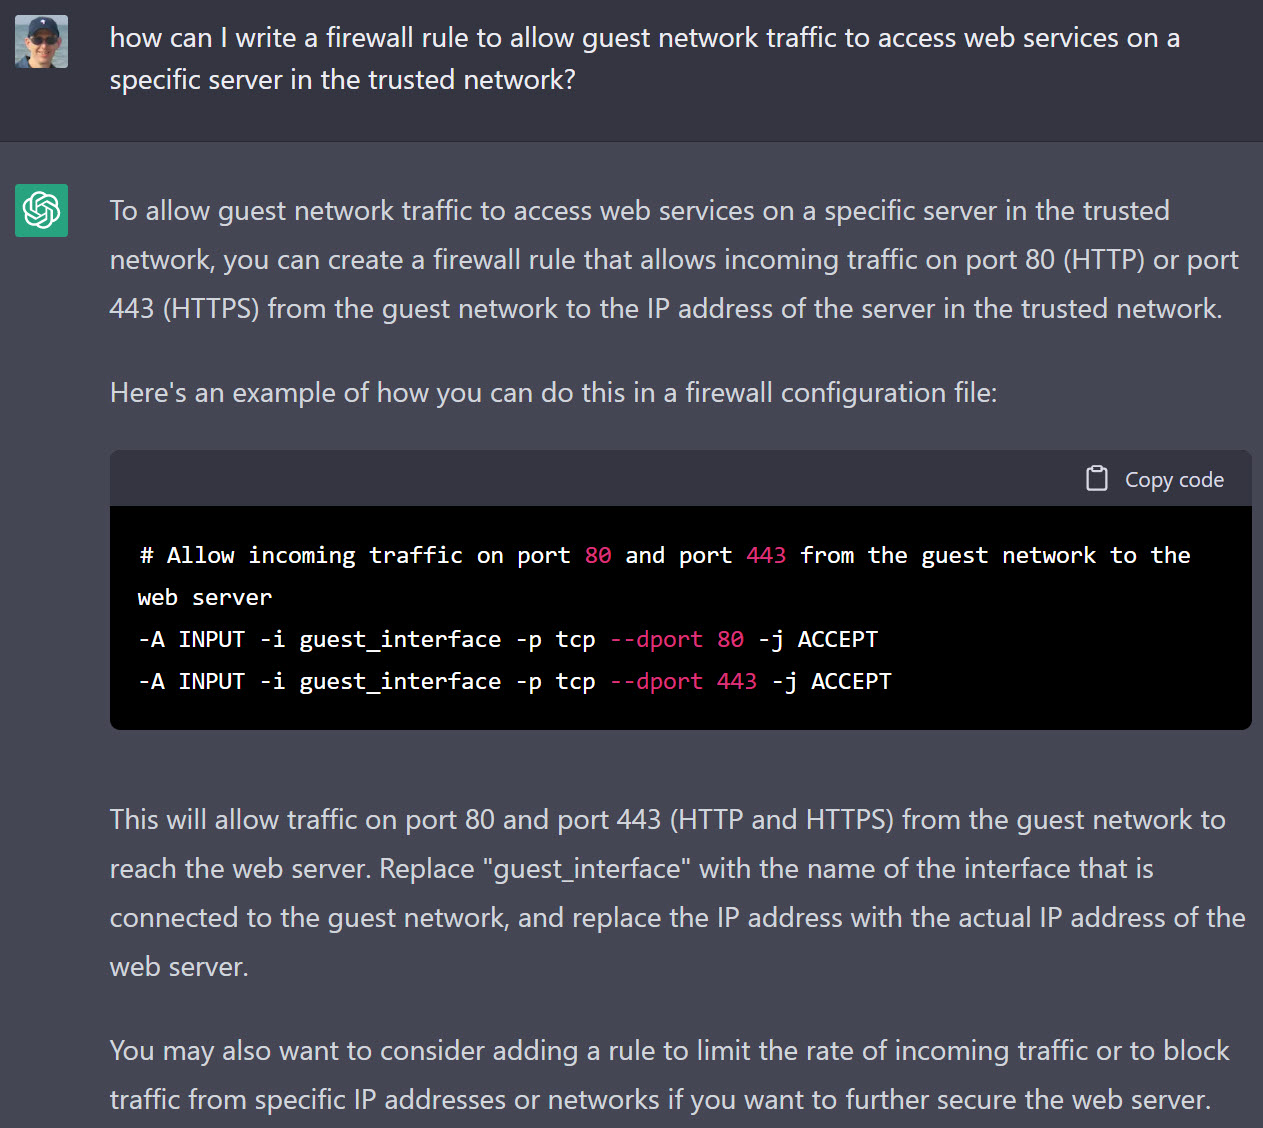
CHatGPT “discussion” about firewall rules
Not too shabby. It’s been in the news lately because all sorts of people (students, bloggers, even lawyers) are using it to write stuff for them. So I figured, why not turn my blogging activities over to the AI? Well, here’s what I got.
First up, I asked ChatGPT to “write a blog post about running Docker containers on a Synology NAS”:
Docker is a powerful platform for building, shipping, and running distributed applications. It allows developers to package their applications and dependencies into a portable container that can run on any system with a Docker engine installed. In this blog post, we will discuss how to run Docker containers on a Synology NAS.
First, make sure that your Synology NAS has the Docker package installed. This can be done through the Package Center in the Synology DSM (DiskStation Manager). Once the Docker package is installed, you can access the Docker settings through the main menu of the DSM.
Next, you will need to create a shared folder on your Synology NAS that will serve as the location for your Docker images and containers. This can be done through the File Station in the DSM. Once the shared folder is created, you will need to set the permissions for the folder so that the Docker service can access it.
Once the shared folder is set up, you can begin pulling images from the Docker Hub. The Docker Hub is a public registry of Docker images that can be easily pulled and run on your Synology NAS. To pull an image, you can use the command
docker pull [image name]in the command line interface (CLI) of your NAS.After you have pulled an image, you can run a container using the
docker runcommand. This command will start a new container based on the image you pulled, and will allow you to specify various options such as port mapping and environment variables.It’s important to note that running containers on your Synology NAS will consume resources, so it is important to monitor the resource usage and adjust accordingly. You can do this through the Resource Monitor in the DSM.
In conclusion, running Docker containers on a Synology NAS is a great way to take advantage of the benefits of containerization without the need for a dedicated server. With the ability to pull images from the Docker Hub and run them on your NAS, you can easily deploy and test your applications in a controlled environment.
That pretty much sums up what I’ve learned the past few weeks playing around with Docker, crazy.
Next up: “I need a 500 word blog post about running Pi-Hole in a Docker container”:
Pi-hole is a popular open-source software that acts as a DNS sinkhole, which blocks unwanted internet traffic at the network level. One of the great things about Pi-hole is that it can be run on a wide range of devices, including a Raspberry Pi, a Linux server, or even a virtual machine. However, one of the most popular ways to run Pi-hole is by using a Docker container.
Docker is a containerization platform that allows you to run applications in a lightweight, isolated environment. By using a Docker container to run Pi-hole, you can ensure that the software is running in a consistent environment, regardless of the host system. Additionally, running Pi-hole in a Docker container makes it easy to update and manage the software.
To run Pi-hole in a Docker container, you will first need to have Docker installed on your system. Once Docker is installed, you can use the following command to pull the official Pi-hole Docker image from the Docker Hub:
docker pull pihole/piholeOnce the image is downloaded, you can use the following command to start a new container:
docker run -d --name pihole -p 53:53/tcp -p 53:53/udp -p 80:80 -p 443:443 pihole/piholeThis command creates a new container named “pihole” and maps ports 53 (DNS), 80 (HTTP), and 443 (HTTPS) from the host system to the container. This allows you to access the Pi-hole web interface and configure the software.
After the container is running, you can use the following command to view the container’s IP address:
docker inspect -f '{{range .NetworkSettings.Networks}}{{.IPAddress}}{{end}}' piholeYou can then use this IP address to access the Pi-hole web interface in a web browser. From the web interface, you can configure the software, view statistics, and manage the blocked domains.
One of the benefits of running Pi-hole in a Docker container is that you can easily update the software to the latest version. To do this, you can use the following command:
docker pull pihole/pihole

docker stop pihole

docker rm pihole

docker run -d --name pihole -p 53:53/tcp -p 53:53/udp -p 80:80 -p 443:443 pihole/pihole
This command pulls the latest version of the Pi-hole image, stops the existing container, removes it, and starts a new container with the latest version. This process ensures that you are always running the most up-to-date version of the software.
Running Pi-hole in a Docker container is a great way to easily manage and update the software. Additionally, by running Pi-hole in a container, you can ensure that the software is running in a consistent environment, regardless of the host system. With the ease of use and flexibility of Docker, running Pi-hole in a container is a great option for anyone looking to block unwanted internet traffic at the network level.
In conclusion, running Pi-hole in a Docker container is a great way to easily and effectively block unwanted internet traffic at the network level. With the ease of use and flexibility of Docker, you can ensure that the software is running in a consistent environment, regardless of the host system, and manage and update the software easily. If you’re looking to block unwanted
Excluding the code snippets, that’s 494 words and apparently it’s pretty literal since it just stopped writing after it thought it had generated 500 words. Not exactly what I was looking for but the content is pretty impressive.
Finally: “what do you know about the blog at www.windracer.net/blog”?
I’m sorry, but my training data only goes up until 2021, and I’m not aware of any website or blog called www.windracer.net/blog, I suggest you to check if the URL is correct and if the website is still active. If the website exists and it is still active, it would likely be a personal or independent blog that covers a wide range of topics, but I cannot confirm this or provide information about the specific content or authorship of the blog, as it would be outside the scope of my knowledge cutoff.
Awww. 🙁
I think I’ll stick to writing my own posts for now …